Texturing is an integral stage of 3D modeling and rendering of a three-dimensional object. The creation of a texture and its imposition on a 3D model determine its quality, realism and accuracy.
The use of professional computer programs, texturing 3d max , for working with graphics give unlimited possibilities for working with 3D objects, regardless of the complexity of the object’s configuration, type of materials, and other things.
Table of Contents
Texturing
A texture is an image (raster format) applied to a polygonal model by overlaying in order to give the model texture, bump, and the desired color.
Texturing is an important stage in the process of creating and rendering a 3D model of a product, which allows you to give the surface of a volumetric object certain parameters and properties, to make it as realistic as possible and similar to a real object.
The texturing quality of an object is determined by units such as texil. Texil is a collection of pixels per 1 texture unit. The image format and resolution of the texture used directly determine the quality of the final results.Here discusses basic (texturation 3d) techniques
Texture Creation- Basic Techniques
There are the following main methods of creating textures:
- rendering in a graphic 2d editor, for example, Photoshop;
- creating a texture in a 3D painting package such as Mudbox, ZBrush, Mari or 3D-Coat;
- construction based on procedural maps;
- Complex application of procedural techniques of various kinds, 2d and 3d format.
For example, if you need to create a brick wall texture, then you need to perform the following sequence of actions:
- Creation of a plane, search and refinement of the texture of a brick wall. Creation of a seamless texture of a brick wall in 2D programs;
- a gloss map is created to give the texture of the brick wall a light, realistic sheen;
- surface roughness is obtained by creating a roughness map;
- the reflectivity of a brick wall is created using a reflection map.
After going through the sequence of these stages, the modeled plane will turn into a realistic natural brick wall.
Types of Texturing
There are the following main types of texturing
- relief texturing;
- MIP texturing.
Relief texturing is a technology for working with 3D graphics that allows you to create the surface of a modeled object in a rich and realistic design.
Types of bump mapping
- Bump mapping is a technology that allows you to give the surface of a modeled object a relief effect and thoroughly detail it. This effect is created by virtually displacing pixels using a single band heightmap and a light source. As a result, participants with varying degrees of illumination can be obtained. Bump mapping is used to create difficult bumpy surfaces, protrusions and depressions.
- Normal mapping – a method for changing the normal of a pixel based on a color normal map. In this case, the changes are saved in texels. This method is the most accurate due to the use of 3 texture channels in the normal map.
- Parallax occlusion mapping is a local ray tracing technique used to determine the heights and visibility of texels. This method creates stronger relief depths. However, it does not allow for detailed detailing of objects.
- MIP-texturing is a method in which, when applying textures, copies of the same illustration of the texture are applied, with varying degrees of rendering of details.
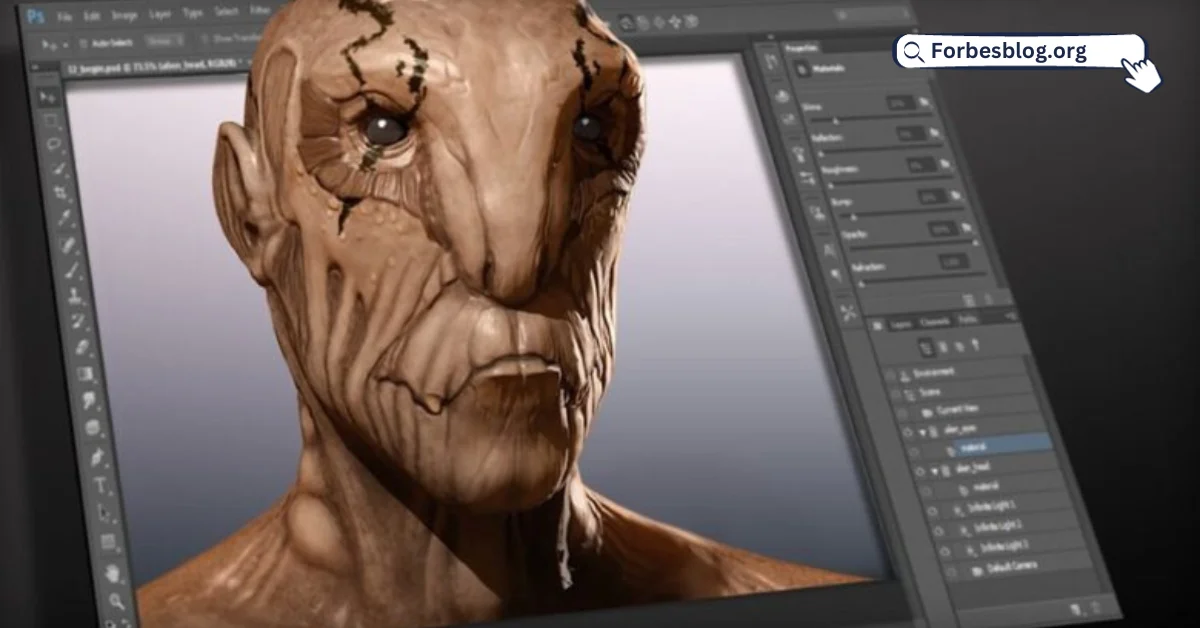
Texturing with Viewport Canvas
In our work we will use a new feature of 3ds max – Viewport Canvas. It seems that it was first introduced in 3ds max 2010, and was significantly improved in 3ds max 2011. If you do not have 3ds max 2011, then, unfortunately, you will not be able to complete this tutorial. Although if you have Photoshop, you could render the UVW template (Unwrap UVW> Parameters> Edit …> Tools> Render UVW Template …) and try to apply the principles themselves somehow. Anyway, let’s load Viewport Canvas and proceed to the coloring texture (PAINTING)
- Select the monster model.
- Open the Viewport Canvas (Tools> Viewport Canvas …).
- Click on the Paint tool (to activate the painting mode)
- Select from the menu Diffuse Color Map: … (Viewport Canvas needs to know in which of the map channels we will draw the texture). A new window will appear.
- Set the size of the texture map to 2000×2000.
- Select a folder for the file, name it something, and select PNG as the file format ( I advise you to choose 24 bit RGB color depth. We do not need an alpha channel).
- Click OK to save the file.
Texturing Viewport Canvas 3ds max 2011
Start drawing texture
Let’s give our monster some color using the Fill and Gradient tools:
- Go to the Front viewport.
- Select green
- Activate the Fill tool and click on the monster.
- Open the Layers dialog box (Layers work exactly the same as in Photoshop ).
- Create and activate a new layer.
- Select color green
- Activate the Gradient tool. By clicking the mouse at the bottom of the monster, hold the button, drag up and release, thus obtaining the desired gradient fill.
Working with Photoshop
Next, we will work with Photoshop, create a texture:
- Open the file seamless-texture-high-res.rar [1,33 Mb] (downloads: 191) in Photoshop.
- Desaturate the image (Image> Adjustments>Desaturate ).
- Apply the Palette Knife filter ( Filter> Artistic> Palette Knife … ). I used the values 15, 3, 0. The idea is to make the texture look like it was painted with a painter.
- The size of the texture must match the size of our texture in 3ds max. If necessary, adjust the dimensions.
- Save the file and return to 3ds max.
Applying Texturing
- Texturing is used for the following purposes :
- demonstration of the object material;
- visual representation of the physical properties of a 3D object;
- modeling lighting and reflection effects to make 3D objects realistic;
- creation of small details on the surface of the modeled object;
- Rendering volumes.
Texturing Errors
The most common texturing errors are:
- incorrect scaling of the texture causes image distortion on the surface of the modeled object;
- selection of low-quality low-resolution textures;
- texturing complex objects using the UVW map tool, instead of UNWRAP UVW, which causes incorrect parameter settings;
- incorrect adjustment of texture transparency, reflection and refraction parameters;
- Multiple duplication of the texture image on one surface reduces its realism.
The animation company provides high-quality 3D modeling of objects and 3d max texturing. Professional software and many years of experience allow us to create 3D models of any complexity.