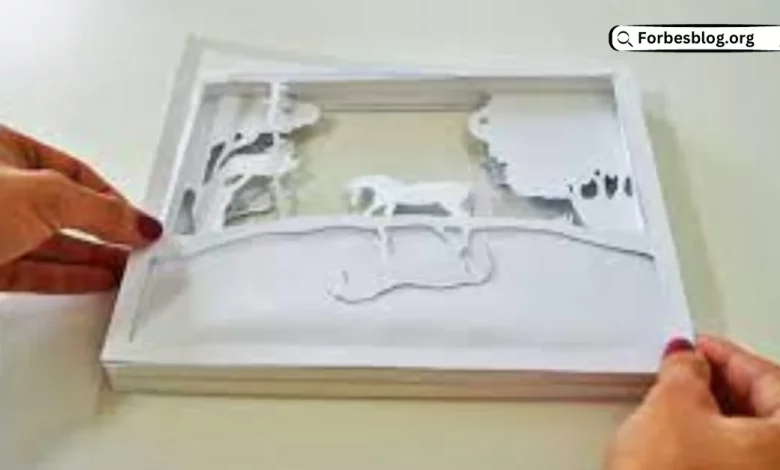
One would be a welcome addition 3D light box to any home or office, and it would make a thoughtful birthday or wedding present. You may either hang it on the wall or set it on a desk in order to completely enjoy its stunning design. Alternatively, this light box consists of layers of paper cutouts stacked on top of each other. Behind each layer, LED lights create a three-dimensional effect. Here, I’ll show you how I made this light box and give you some ideas on how to replicate the same effect on your own, so you may build your own.
Table of Contents
If you’re just getting started, make something up from scratch or utilise a template.
As a result, the 3D light box initial step is downloading and printing the template. It may, however, be changed in height or width to fit any 8-by-10-inch light box (20 by 25 centimetres). Additionally, you can think of something really original.
You should use 3D light box 170 grammes of white cardboard, which is both sturdy and thin enough to enable light to travel through.
Begin by drawing the first layer of your design on a piece of card stock, and then add a 1 cm border around each layer. Connecting the layers will be a lot simpler now. This is a location where nothing ever happens. You can get paper cut light box vorlage kostenlos on our website.
Trim away any unnecessary layers.
fter you’ve finished the first layer, you may remove it with an X-Acto knife. In order to get the most precise and sharpest cuts possible on your projects, use an X-acto knife.
Create the second layer by moving the first layer to a fresh piece of card stock. Afterward, apply the second coat and complete the job. After slicing all of the layers, repeat the procedure for each one individually.
The Night Sky and the Moon
On the last layer, I produced a gigantic moon and stars, which I then painted over. I used a utility knife and a pin to carve out a moon and star shape on a piece of foam board using these tools.
Surfaces should be coated with adhesive.
For ease of reassembling, foam spacers are inserted between each layer. This approach produces a three-dimensional look and a sense of depth. The foam spacers may now be removed. In terms of height and width, they are identical. I made 12 25-cm-long spacers and 12 18-cm-long spacers, my first attempts at making spacers. Each layer should include four spacers. After that, a generous dollop of superglue will do the trick to keep everything together. Once the first layer has been bonded in place, the second layer should be positioned on top of it. Make sure the layers are correctly aligned before moving on. Make sure that each of the layers is connected together before moving on to the next.
Visit for more articles: forbesblog.org