
Fall is the perfect time to indulge in creative hobbies. Lots of thematic decorating ideas. More time spent indoors than we could devote to our favorite activities. And, of course, a spooky party knocking on our doors. Yes, during Halloween, we mainly talk about decorations, disguises, and makeup. But the party is also an excellent opportunity to trigger your kids’ imagination while spending more quality time with family. Discover our small selection of Halloween DIY ideas for kindergarten. There will be plenty to make you want to tinker with your little pieces of cabbage.
Table of Contents
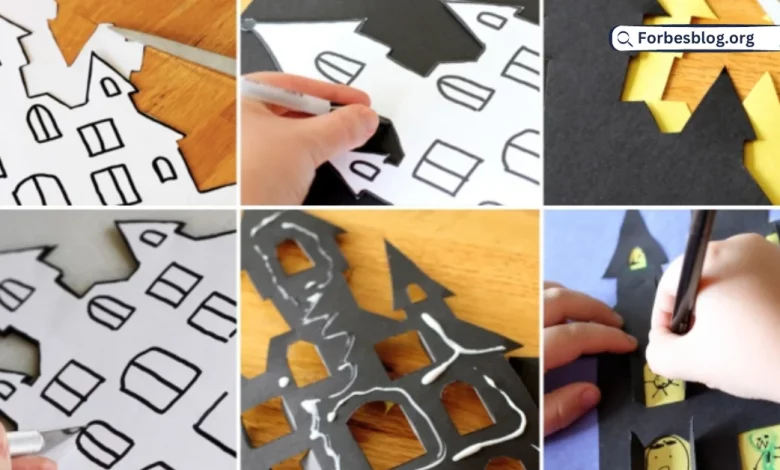
A Halloween haunted house very easy to achieve
Necessary material:
- A house template (optional)
- Thick black and yellow paper
- A cutter
- Glue
- A pair of scissors
- A fine black marker
To make this haunted house:
- Cut it out of black and yellow paper. You can make a template yourself or download the ready-made template by clicking on the link.
- Mark the windows with a felt-tip pen and cut them with a cutter, following the black outlines.
- Glue the black house on the yellow paper.
- Draw Halloween characters on the yellow paper.
- Your haunted house is already ready.
Halloween DIY in kindergarten with scrap materials
Necessary material:
- Cans
- Different colored felt coupons patterned felt sheets
- A hot glue gun
- Moving eyes to stick
- A pair of scissors
Manufacturing:
- Cut pieces of patterned felt that could cover the cans. Glue the leaves around the boxes.
- To decorate your funny monsters, let children cut out eyes, mouths, and assorted hair from the felt.
- Glue the various face shapes onto the cans and cool drawings.
Witch in Cardboard Plate: Easy Tutorial for an Easy and Fun DIY Halloween Witch
Necessary material:
- A cardboard plate
- Gray, yellow, and black matte acrylic paint
- Foam brushes
- A cup
- A pencil
- A fine black marker
- Orange and light brown woolen threads
- A wooden ice cream stick
- A mobile eye to stick
- Sheets of thick black and green paper
- A pair of scissors
- A cutter
DIY:
- Set the bowl upside down on the plate and trace its outline in pencil. The drawn circle represents the full moon. Paint the inside of the circle yellow and the rest of the plate gray.
- Make a witch out of a wooden ice cream stick with scraps of paper and yarn glued to it.
- Using the cutter, make a small incision on the plate to insert the witch.
Halloween activity for children: a step-by-step vampire bat with little material
Necessary material:
- Thick paper of different colors
- Empty toilet paper rolls
- Glue, tape, and a pair of scissors
- Moving eyes to stick
The steps to follow:
- Cut strips of paper wide enough to cover the toilet paper rolls. Glue or tape them to the paper rolls.
- Draw the wings of the bat on black paper, then cut them out.
- Glue wiggly eyes to toilet paper rolls. Fold the top and bottom of the rollers to give shape to the bats.
- Secure the wings to the roll using a little glue or tape.
- Cut small triangles in white paper to form the teeth, then glue them on the roll.
Halloween DIY idea with plasticine in the shape of a pumpkin
Necessary material:
- Self-hardening plasticine
- Acrylic paint
- A straw
- A stick
- A green ribbon
Manufacturing:
- Roll out the self-hardening paste to a thickness of about 1.5 cm. Please have your child rest their hand in the center of the dough.
- Shape the dough into the shape of a pumpkin with a tail. Smooth the edges and make a hole in the bottom using a straw.
- Leave to dry for 24 hours.
- Using the acrylic paint of your choice, paint the imprint to transform it into a Halloween character (ghost, Frankenstein, corn kernel candy, etc.). Paint the rest of the pumpkin in orange and the tail in brown.
- Pass the green ribbon through the hole and tie a knot.
Scratch off drawings on a cardboard plate: a fun and straightforward Halloween activity
The material we will need:
- A cardboard plate
- Black chalk
- Fluorescent markers
- Brushes or sticks for scratching
The steps to follow to succeed in this easy and clever Halloween activity
- We start by painting the entire surface of the plate in various colors and neon.
- Then, we must cover everything with black chalk to hide the colors underneath.
- Using paintbrushes or sticks, scrape different shapes on the black chalk.